

This guest post is by Todor Stojanov
The usage of Standard Measuring Positions is very important during the measurements inspection procedure because it will ensure avoiding of many mistakes and misunderstandings between suppliers and customers (buyers)
The most of the faults that appear in the measurements inspection process are result of the suppliers and customers using different measuring positions, which will implicate giving different measuring results at both sides. In order to avoid this kind of problems, suppliers and customers need to use same standard measuring positions.
The Standard Measuring Positions are graphically presented on figures 1, 2 and 3. The measuring positions are marked with letter symbols and every symbol is additionally explained.
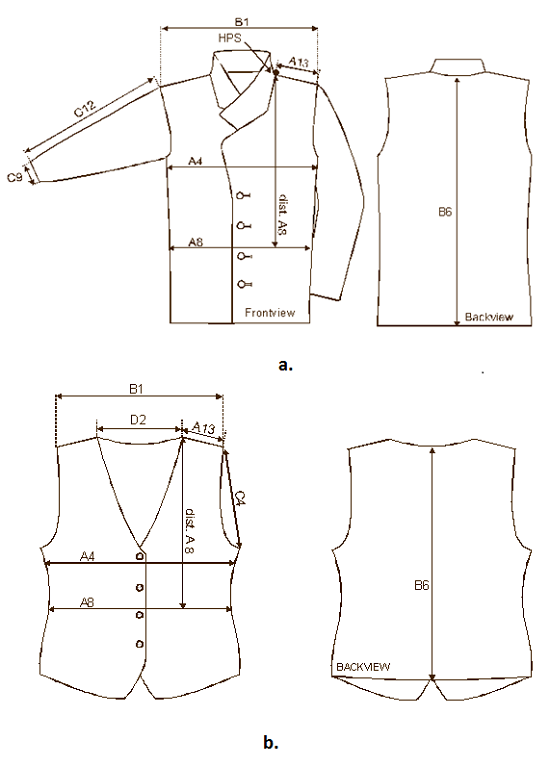 |
| Figure 1. Sketch of standard measuring positions for a. blazer men/boys, b. waistcoat men/boys
|
Table-1: Code Definitions for the Standard Measuring Positions for Blazer Men/Boys
|
A4
|
½ Chest
|
 |
Measure flat, straight across front
of garment 1″/2,5 cm down from lowest point of armhole from edge to edge. |
|
Dist.A8
|
Waist Height Front from HPS
|
|
|
Define distance straight down from
HPS |
|
A8
|
½ Waist
|
|
|
Define distance straight down from
HPS and measure flat, straight across garment from edge to edge. |
|
A13
|
Shoulder Length
|
|
|
Measure along natural shoulder the
distance from HPS to highest point of armhole excluding trims. |
|
B1
|
Across Shoulder
|
|
|
Measure flat, straight across front
from highest point of armhole to highest point of armhole. |
|
B6
|
Centre Back Length
|
|
|
Measure straight down from centre
back neckline point to bottom of garment. |
|
C9
|
½ Sleeve Opening
|
|
|
Measure flat, straight across
finished edge of sleeve from edge to edge. |
|
C12
|
Sleeve Length from Shoulder
|
|
|
Measure along folded edge of sleeve
from highest point of armhole to bottom of sleeve, including cuff. |
|
|
Table 2: Code Definitions for the Standard Measuring Positions for Waistcoat Men/Boys
|
A4
|
½ Chest
|
|
|
Measure flat, straight across front
of garment 1″/2,5 cm down from lowest point of armhole from edge to edge. |
|
Dist.A8
|
Waist Height Front from HPS
|
|
|
Define distance straight down from
HPS |
|
A8
|
½ Waist
|
|
|
Define distance straight down from
HPS and measure flat, straight across garment from edge to edge |
|
A13
|
Shoulder Length
|
|
|
Measure along natural shoulder the
distance from HPS to highest point of armhole excluding trims. |
|
B1
|
Across Shoulder
|
|
|
Measure flat, straight across front
from highest point of armhole to highest point of armhole. |
|
B6
|
Centre Back Length
|
|
|
Measure straight down from centre
back neckline point to bottom of garment. |
|
C4
|
Armhole Straight
|
|
|
Place front armhole curved and
measure the straight line between highest and lowest point of armhole. |
|
D2
|
Neck Width Inside
|
|
|
Measure flat, straight across neck
opening from edge to edge excluding trimming or piping. |
 |
| Figure 2. Sketch of standard measuring positions for shirts |
Table 3: Code Definitions for the Standard Measuring Positions for Shirts
|
A4
|
½ Chest
|
|
|
Measure flat, straight across front
of garment 1″/2,5 cm down from lowest point of armhole from edge to edge. |
|
Dist.A8
|
Waist Height Front from HPS
|
|
|
Define distance straight down from
HPS |
|
A8
|
½ Waist
|
|
|
Define distance straight down from
HPS and measure flat, straight across garment from edge to edge |
|
A13
|
Shoulder Length
|
|
|
Measure along natural shoulder the
distance from HPS to highest point of armhole excluding trims. |
|
B6
|
Centre Back Length
|
|
|
Measure straight down from centre
back neckline point to bottom of garment. |
|
C10
|
Total Cuff Opening
|
|
|
Take measurement with cuff open and
measure flat and straight from centre of button to end of buttonhole. For a double cuff / French style cuff opening, measure flat and straight from end of buttonhole to end of buttonhole. |
|
C12
|
Sleeve Length from Shoulder
|
|
|
Measure along folded edge of sleeve from
highest point of armhole to bottom of sleeve, including cuff. |
|
C20
|
½ Upper Arm
|
|
|
Measure flat, straight across sleeve
1 cm down from lowest point of armhole parallel to sleeve/cuff opening from edge to edge. |
|
D5
|
Collar Stand Opening
|
|
|
Measure straight along collar stand
from centre of button to end of buttonhole. |
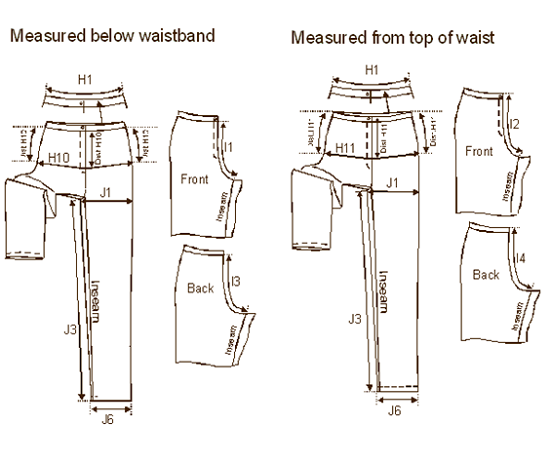 |
| Figure 3: Sketch of standard measuring positions for Jeans, Trousers/ Casual Trousers |
Table 4: Code Definitions for the Standard Measuring Positions for Jeans Trousers/Casual Trousers
|
H1
|
½ Waist
|
|
|
Place top edges even at waist and
measure along the top edge following the shape of waistband. |
|
Dist.H10
|
Low Hip Below Waistband
|
|
|
Define distance straight down below
waistband. |
|
H10
|
½ Low Hip
|
|
|
Define distance down from waistband
seam at centre front and at side edges. Measure hip by pivoting tape between these three defined points, waist is lying naturally. |
|
Dist.H11
|
Low Hip from Top of Waist
|
|
|
Define distance straight down from
top of waist |
|
H11
|
½ Low Hip
|
|
|
Define distance down from top of
waist at centre front and at side edges. Measure hip by pivoting tape between these three defined points, waist is lying naturally. |
|
I1
|
Front Rise Below Waistband
|
|
|
Measure down from waistband seam
following curve of front rise seam to crotch seam. |
|
I2
|
Front Rise from Top of Waist
|
|
|
Measure down from top of waist of
garment following curve of front rise seam to crotch seam. |
|
I3
|
Back Rise Below Waistband
|
|
|
Measure down from waistband seam
following curve of back rise seam to crotch seam. |
|
I4
|
Back Rise from Top of Waist
|
|
|
Measure down from top of waist of
garment following curve of back rise seam to crotch seam. |
|
J1
|
½ Thigh
|
|
|
Measure flat, straight across front
leg at lowest point of rise seam from edge to edge parallel to the leg opening. |
|
J3
|
Inseam
|
|
|
Measure down from rise crotch seam to
bottom of garment, following curve of inseam. |
|
J6
|
½ Leg Opening
|
|
|
Measure flat, straight across at
bottom of garment from edge to edge. |
The same standard measuring positions should be used by all of the sides involved in the apparel supply chain process and during all the stadiums of production, starting from product development, first sample approval, size set approval till the final QC inspection of the finished goods.
What if during the final inspection of the finished order we detect measurements that are out of tolerance?
In addition, the Measurements Inspection Procedure for finished goods is presented. The table on figure 4 can be used.
 |
| Figure 4. Measurements Inspection Table |
Measurements Inspection Procedure:
- Specify the name of the QC inspector, date of the inspection and supplier name.
- Specify the order number, color, quantity and delivery date.
- Specify the sizes that need to be measured, the code (symbol) for every measuring position and measurement in cm (inch).
- Specify the tolerance limit for every measurement.
- When going do the measuring, use 12 fields (3 rows and 4 columns) for every size (see Fig.4).
- Measure the first 4 pieces and if the measurement is correct than mark with √ into the empty field, but if the measurement is bigger or smaller, than mark +/- to show how many cm is the difference than the required one.
- If there is no measurements out of tolerance, than continue with the next size, but if there are measurements out of tolerance, than measure another 4 pieces from the same size. If there are more pieces with measurements out of tolerance, than repeat the same procedure third time. If there are still peaces with measurements out of tolerance, than after the third time the order needs to be blocked and repaired.
- The problem should be explained in the field for comments and the possible problem solving solution should be proposed. Until the next inspection, the sign FAIL in the report needs to be marked.
Note: If needed, I can provide the Standard Measuring Positions for other types of apparel products.
|






Leave a Reply